Sewing Machine Covers in Colorblock
Making covers for my sewing machines has been on my to-do list for so long. I finally did it!

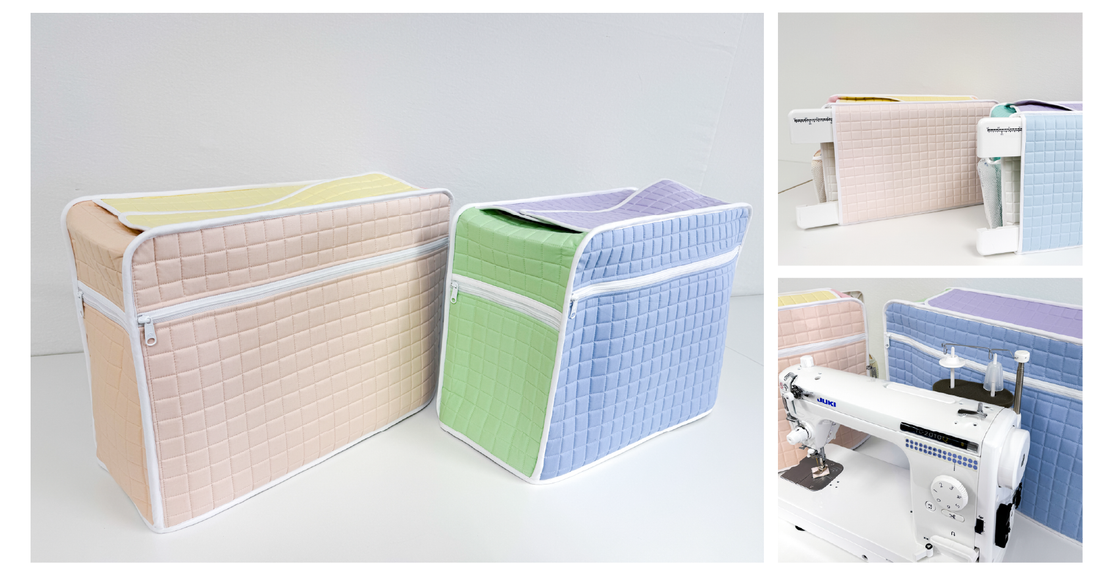
My machine is a Juki TL-2010Q, and I have two of them. I used to just keep the second one as a backup, but now I have them both set up as workstations in the studio: one for 50-wt thread and one for 40-wt thread. It's really convenient so I don't have to fiddle with tension adjustments when I want to sew versus quilt.


The pattern is called Under Cover, designed by the folks at ByAnnie. I made the large size, and it fits my machines wonderfully!


There are two different options for the back pocket: top or side entry. I chose the side entry since I wanted the extension table to slide in that way. It's a snug fit, and it's great.

The fabric colorblocking is courtesy of our Rainbow Value One 12 FQ bundle, which is a pastel rainbow gradient of Kona Cotton colors. I used 10 of the fabrics: 5 warm colors for one cover, and 5 cools for the other. Everything else is White Kona Cotton, including the linings and bindings.

The majority of the cover was made from 7 fat quarter sandwiches of Soft and Stable: 5 sandos of color + white, and 2 white + white. Quilting fat quarter sized pieces is pretty fun, since they're so easy to maneuver on my sewing machine. I quilted a simple one-inch grid.

Modifications and Tips:
- Omit the border. I just like the look without it.
- Omit the zipper pulls (the fabric tabs).
- Omit the magnets for the flaps. I didn't feel like it really needed an enclosure at all. That eliminated so many steps!
- I wasn't sure which side was the top for the mesh elastic, so I made it both ways. Either way holds the foot pedal just fine.
- Use a size 14 Topstitch needle then switch to a size 16 at Step VII. The layers accumulate and need a heftier needle so your needle won't break. Ask me how I know.
- Also in Step VII, you'll be binding over some thick seams. Flatten the really thick areas (the ones with binding) before sewing so you don't break a needle. Press or lightly pound with a flat tool such as a mallet. Or if you have a table press (such as KAMsnaps), the clamping dies for key fob hardware are fantastic for this!

Here are the supplies I used for each cover:
- Under Cover Sewing Pattern
- Rainbow Value One 12 FQ bundle - you'll use 10 fat quarters and have 2 left for another project.
- Kona Cotton - White - 3 yards
- Soft and Stable [Amazon] - you'll need multiple packages
- Signature Cotton 40wt thread - Parchment - for quilting. This color is like a creamy vanilla that blends beautifully.
- So Fine Polyester 50wt thread - Snow - for construction. This polyester thread is really strong and will hold construction seams securely. This Snow color blends well with White zippers.
- Zipper - Double Slide - 40 in - White
- Mesh Fabric - White
- Fold Over Elastic - White
- Superior Sewing Machine Needles - Topstitch 14/90 and Topstitch 16/100
- Wonder Clips
- Clover Water Erasable Marker - Blue - for the markings when rounding the corners.
- Point 2 Point Turner and Hera Marker - for all the other marking lines.
- Juki TL-2010Q Sewing Machine [Amazon]
The Amazon links are an affiliate links, which means that if you buy, we’ll earn a commission at no additional cost to you. Please know that we have experience with this product, and we recommend it because it is helpful, not because of the small commission we'd make if you decide to purchase. Thanks!
The Soft and Stable stabilizer is a key part of this project: it's what keeps the cover standing up and gives its sturdy shape. It stands up even when the cover isn't on the machine!


I am super pleased with both of these covers. They take quite a bit of time to make and use a lot of Soft and Stable, but I'm going to have them forever, so it's worth it!
And they look so good in my sewing room :)
by Angela Bowman, Owner of Sewfinity
4 comments
Thanks Evonna! I mean the fabric tabs that attach to the zipper pull hardware. Sorry about that :)
Beautiful covers! Love the fabric choices. May I ask what you mean by your tip to omit the zipper pulls? I see zippers with pulls in the pics. Thank you!
I love these so much!!! Such a great project. Adding this to my to-do list!!!
I love the design! The colors are so pretty.